Embarking on the adventure of canning Chicken Fajita bowls at home has been nothing short of a culinary revelation for me.
It’s a practice that blends the art of cooking with the science of preservation, allowing me to capture the essence of a hearty, comforting meal in a jar.
This journey began as a quest for convenience, but it quickly evolved into a passionate hobby, one that fills my kitchen with the rich aromas of spices and the satisfying sizzle of chicken and vegetables as they dance together in the skillet.
Canning Chicken Fajita bowls is more than just meal prep; it’s a celebration of food, a ritual that honors the simplicity of ingredients and the complexity of flavors. It’s a practice that has taught me patience, precision, and the joy of anticipation.
As I share this recipe and the lessons learned from my personal experience, I hope to inspire others to explore the rewarding art of canning, to discover the pleasure of creating something truly special from the comfort of their own kitchens.
Ingredients:
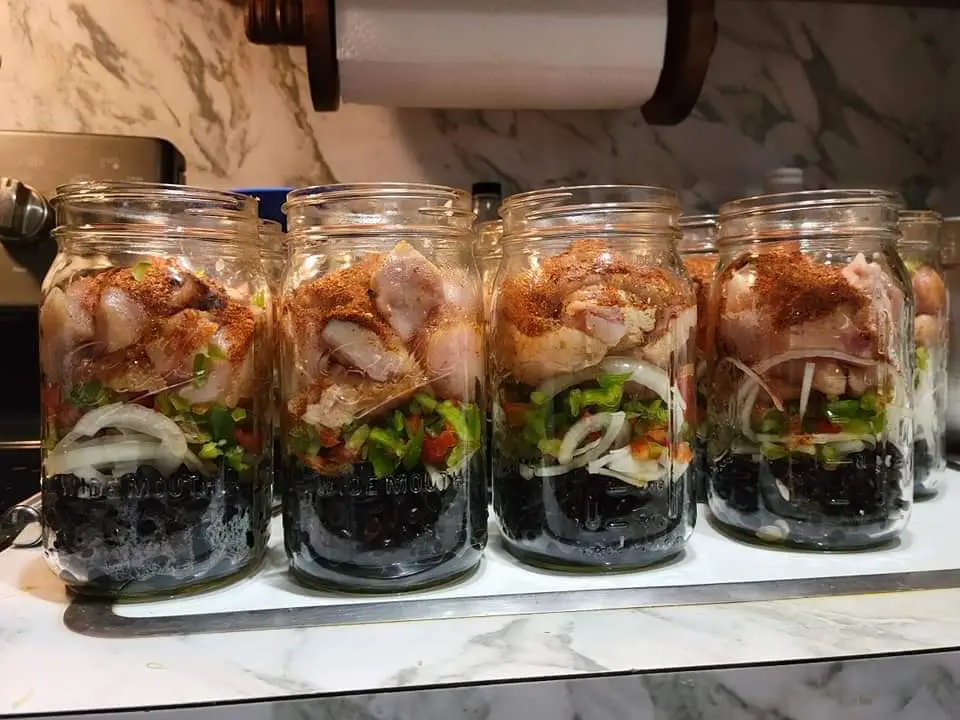
- 2 lbs of chicken breast, thinly sliced
- 2 bell peppers (choose different colors for variety), sliced
- 1 large onion, sliced
- 2-3 cloves of garlic, minced
- 1 can of diced tomatoes, drained (optional)
- 2 tsp of chili powder
- 1 tsp of cumin
- 1 tsp of paprika
- Salt and pepper, to taste
- Lime juice, freshly squeezed (optional)
- Olive oil
- Rice or quinoa, cooked (for serving)
- Canning jars with lids and rings
Instructions:
- Prepare the Chicken and Veggies: In a large bowl, mix the chicken, bell peppers, onion, and garlic. Add the chili powder, cumin, paprika, salt, and pepper. Drizzle with olive oil and lime juice, then toss to coat everything evenly.
- Cooking: In a large skillet over medium-high heat, sauté the chicken and vegetable mixture until the chicken is fully cooked and the vegetables are tender but not mushy. If you’re using diced tomatoes, stir them in at the end to heat through.
- Prepare for Canning: While you’re cooking the fajita mix, get your canning jars ready. Wash them in hot, soapy water and then sterilize them. I usually do this by placing the jars in a canning pot with water and boiling them for about 10 minutes. Keep the jars hot until they’re filled.
- Filling the Jars: Carefully spoon the chicken fajita mixture into the hot jars, leaving about an inch of headspace at the top. If you’re adding rice or quinoa to your bowls, layer that in first before adding the fajita mix.
- Sealing: Wipe the rims of the jars with a clean, damp cloth to remove any residue or food particles. Place the lids on the jars, then screw on the rings until they’re finger-tight.
- Processing: Process the jars in a pressure canner according to the manufacturer’s instructions for your altitude and the size of your jars. Chicken needs to be processed under pressure to ensure safety. For pint jars, this is usually at 10 pounds of pressure for 75 minutes, and for quart jars, 90 minutes. Adjust the pressure based on your altitude if necessary.
- Cooling: Once processed, turn off the heat and let the pressure canner naturally release pressure. Carefully remove the jars and let them cool on a towel or cooling rack for 24 hours without touching or moving them.
- Check Seals: After cooling, check that the lids have sealed by pressing down in the center. If the lid doesn’t pop back, it’s sealed. Any jars that haven’t sealed can be refrigerated and consumed within a few days.
Tips from Personal Experience:
- Flavor Adjustments: Don’t be afraid to adjust the seasonings to your taste. Adding a bit of smoked paprika can give a nice smoky flavor.
- Lime Juice: A squeeze of lime juice before sealing adds a fresh zesty flavor that brightens the dish.
- Pressure Canning is Key: Because chicken is a low-acid food, pressure canning is necessary to prevent bacterial growth. Always follow safety guidelines closely.
RELATED: Freezing Onions: A Smart Kitchen Hack for Saving Time and Money
This method of meal prep has been a game changer for me, providing convenience without sacrificing flavor or nutrition. Plus, there’s something deeply satisfying about opening a jar of homemade Chicken Fajita bowls that you’ve prepared yourself. Enjoy the process and the delicious results!
FAQs for Canning Chicken Fajita Bowls
Can I use beef or pork instead of chicken in this recipe?
Absolutely! Beef and pork are excellent alternatives to chicken and can be canned using the same process. Just ensure that the meat is cooked thoroughly before canning, and always follow the recommended pressure canning times and pressures for the type of meat you’re using.
How long do the canned Chicken Fajita bowls last?
When properly sealed and stored in a cool, dark place, your canned Chicken Fajita bowls can last for up to a year. However, for the best quality and flavor, I recommend consuming them within 6 months.
Can I add rice or beans directly into the jars before canning?
Yes, you can add pre-cooked rice or beans to the jars before canning. Just be mindful of the space they take up. Ensure you still leave about an inch of headspace at the top of the jar. Remember that adding these ingredients will affect the overall texture and moisture content of your meal.
Is it necessary to use a pressure canner? Can I use a water bath canner instead?
It is essential to use a pressure canner for this recipe because chicken is a low-acid food, which requires pressure canning to eliminate the risk of botulism and other foodborne pathogens. A water bath canner does not reach a high enough temperature to safely process low-acid foods like meat.
How do I know if the jars have sealed properly?
After the jars have cooled for 24 hours, check the seals by pressing down in the center of the lid. If the lid doesn’t pop back, it’s sealed. Additionally, the lid should not move when you lightly tug on it. If a jar hasn’t sealed properly, refrigerate it and consume the contents within a few days.
Can I adjust the seasonings in the recipe?
Definitely! Feel free to adjust the seasonings to match your taste preferences. Just be cautious with adding ingredients that may significantly alter the acidity or moisture content of the mixture, as this could affect the canning process and the safety of the final product.
What should I do if a jar breaks during processing?
Jar breakage can occasionally happen. If a jar breaks during processing, carefully remove any large pieces from the canner, but it’s safest to wait until the end of the processing time and the canner has fully depressurized. Clean the canner thoroughly before using it again. To minimize breakage, ensure your jars are not cold when filled with hot contents or placed into the canner.
Can I double the recipe?
You can certainly double the recipe as long as you maintain the proper headspace in each jar and process the jars in batches that fit your pressure canner. Do not overload your canner, as this can affect heat circulation and processing times.
What do I do if I don’t have a pressure canner?
Unfortunately, pressure canning is the only safe method for canning meat, including the Chicken Fajita mixture. If you don’t have a pressure canner, you might consider freezing the cooked fajita mixture instead. Freeze it in suitable containers or freezer bags, and it will keep well for several months.
Is it safe to can foods at home?
Yes, home canning can be perfectly safe when you follow USDA guidelines and use the proper equipment. Always adhere to recommended processing times and pressures, and never take shortcuts with cleanliness or sterilization. Educating yourself on safe canning practices is crucial to ensure the safety of the food you preserve.
